Spring-Boot2.0 + Spring Security + Oauth2如果对Spring Security和Oauth2比较熟悉,可以直接跳过第1、2部分,直接到第三部分。
Spring Security
Spring Security是一个强大的高度可定制化的身份认证与访问控制框架,它用于为Spring框架开发的应用提供标准的安全保障。Spring Security这个框架专注于为应用提供授权和认证服务,它的强大在于用户可以非常灵活地自定义权限访问。
Spring Security的特性
- 全面可扩展地支持了认证和授权
- 对抗Session固定攻击、点击劫持、伪装跨站访问等
- 整合Servlet API
- 可自由选择是否与Spring MVC集成
Oauth2.0
Oauth2很显然是Oauth协议的版本2,Oauth也可以称为是框架,其允许用户授权第三方的应用接入到某一个应用中访问自己的信息,并授权一定的HTTP服务访问能力,而不需要将自己的用户名和密码提供给第三方应用或者分享他们数据的全部内容。Oauth2则是Oauth的改进版本,其简化了Oauth的一些机制,让不同应用之间的交互更加安全方便。Oauth2.0主要关注客户端开发者的简易性,要么通过组织在资源拥有者和HTTP服务商之间的被批准的交互动作代表用户,要么允许第三方应用代表用户获得访问的权限。
Oauth2目前来说在各个厂商的各大应用中获得了比较好的效果,例如Google和Facebook。
Roles
Oauth2包含了4个角色
- Resource Owner: 资源拥有者,通常就是用户你自己;
- Resource Server: 那些保管了你个人资源信息的服务器,例如Google会管理你的个人资料和信息;
- Client: 需要访问Resource Server的那些应用,例如可以是一个PHP网站、安卓客户端、或者JavaScript应用等;
- Authorization Server: 为Client应用提供访问token的服务者,这些token会用于Client访问Resource Server中对应用户的资源信息。认证服务通常会和资源服务(Resource Server)部署在一起,只是角色分开。
Tokens
Tokens 是一系列由认证服务器生成的随机字符,每当客户端请求获取对应的用户的token时认证服务器会下发对应的Token给客户端,通常又两种Token类型
- Access Token: 这种Token是最常用的Token,第三方用户通常都是用这个Token作为自己访问用户资源的钥匙,通常Client客户端会将这个Token追加到请求的参数中或者添加到请求的Header中来请求资源服务器,这种Token通常会有一定的时效,资源服务器会设置这个时效,一旦过期了对应的Token将不再可用,客户端必须重新获取新的Token进行资源访问。
- Refresh Token: 刷新Token是相对于Access Token而提出的,由于Access Token一般都会有时效,那么当某一个Access Token不可用的时候便可以用刷新Token获取一个新的Access Token。为了安全起见,客户端并不是总能获取得到这个刷新Token的。
Access token scope
scope是一个对客户端访问资源的权限限制的参数,授权服务器Authorization Server会定义一个scope列表,客户端在请求获取Token的时候需要将scope作为一个参数提交,这个scope参数的内容越多,那么获得的资源访问能力就越多,这个通常都是用户授权给客户端的。
Register as a Client
由于客户端想要通过Oauth2来获得资源服务器中用户的资源内容,因此客户端需要向认证服务器注册一个client,注册client的参数包含如下几个
- Application Name: 应用的名称
- Redirect URLs: 认证码和Access Token所对应client的URLs
- Grant Type(s): 授权的类型,一般有四种
- JavaScript Origin(optional): 设置被允许访问资源服务器的主机名
资源服务器收到client的注册内容之后返回的内容如下
- Client Id: 一个唯一的随机字符
- Client Secret: 需要秘密保管好的客户端密码
Authorization grant types
Oauth2定义了4中授权类型,这4中授权类型需要根据不同的场景进行使用,下面分别介绍
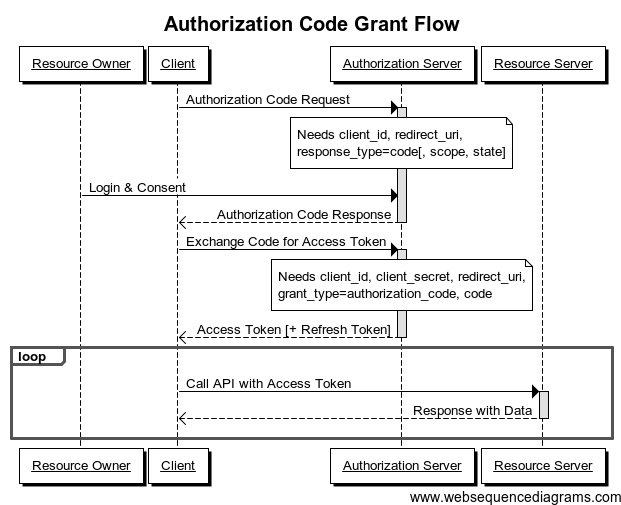
Authorization Code Grant
授权码适合在Client是一个web服务器的时候,这个方式允许web保持一个长时间的Access Token因为可以通过refresh Token来刷新服务器(只要授权服务器允许这种行为)。
例子
- 资源拥有者: 用户
- Resource Server: Google 服务器
- Client: 任何一个网站
- Authorization Server: Google的认证服务器
场景
- 当一个网站想要获取用户的Google个人信息
- 这个网站会重定向到Google的认证服务器
- 如果你授权通过了这个访问,认证服务器会给网站回调发送一个认证码
- 之后客户端网站便和认真服务器通过认证码来获取Access Token
- 之后网站便可以获取到用户在Google上面的个人资源信息
用户在这个过程中不会看到Access Token,网站会自行存储这个Access Token,Google 认证服务器在下发Access Token的同事一般还会下发Refresh Token
时序图如下
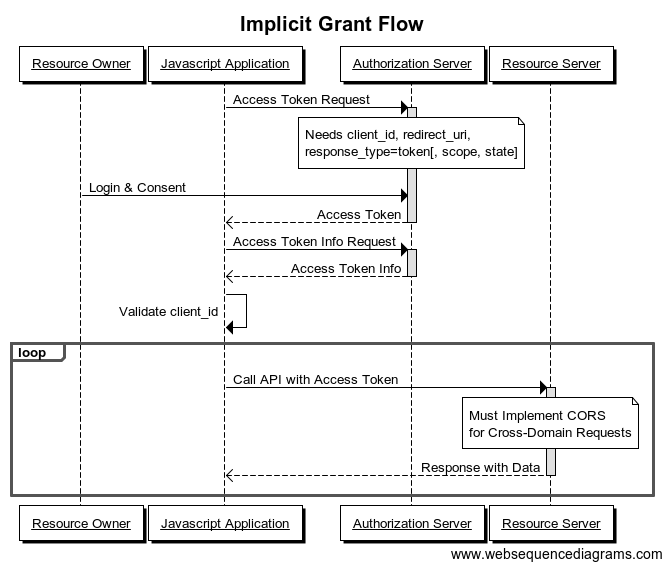
Implicit Grant
当网页通过一些脚本语言例如JavaScript作为Client客户端的时候,这种情况不允许脚本获取到Refresh Token。
例子
- Resource Owner: 用户
- Resource Server: Facebook 服务器
- Client: 使用AngularJS的网站
- Authorization Server: Facebook 服务器
场景
也许你会很好奇为什么Facebook允许客户端直接通过添加Access Token而不会被跨域规则所拦截下来。这是可能的也是允许的,因为有CORS(Access-Control-Allow-Origin)的帮助。具体可以查看Access-Control-Allow-Origin
Attention! This type of authorization should only be used if no other type of authorization is available. Indeed, it is the least secure because the access token is exposed (and therefore vulnerable) on the client side.
时序图如下
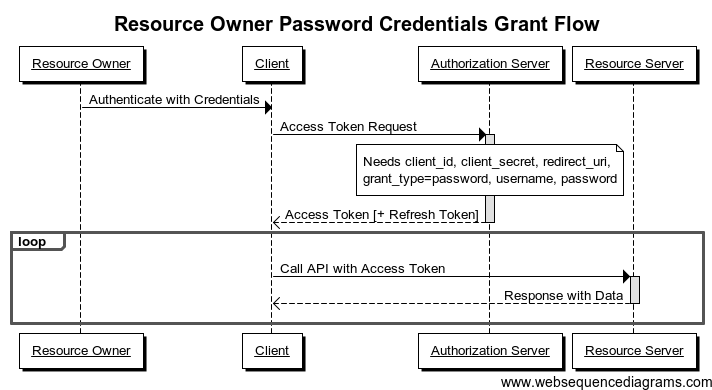
Resource Owner Password Credentials Grant
这种认证方式比较特别,认证的信息(也就是密码)是先传给客户端网站,客户端网站拿着密码去和认证服务器通讯获得对应的Access Token,因此说这两个应用都需要有同等的信任关系,所以一般来说这种方式用于两个应用属于同一个单位或者企业的应用之间使用,例如有一个网站属于example.com,现在它需要授权访问api.example.com下面所保护的资源,那么用户自然会愿意将自己的密码授权给客户端网站,因为他的账号密码就是从example.com所获得的。
例子
- Resource Owner: 用户在
acme.com网站(属于Acme公司)注册了账号 - Resource Server: Acme公司在
api.acme.com暴露 API - Client: Acme公司下的
acme.com网站 - Authorization Server: Acme的认证服务器
场景
- Acme 公司想将自己的REST API提供给第三方应用。
- 为了避免重复造轮子,公司觉得用自己的API会很方便
- 因此公司需要获得一个Access Token来访问对应的那些API
- 为此公司的网站要求用户登录并授权REST API给其他的应用
- 服务端应用 (acme.com) 会和认证服务器进行交互获得对应的Access Token
- 之后应用便可以使用Access Token访问对应的资源了(api.acme.com).
时序图
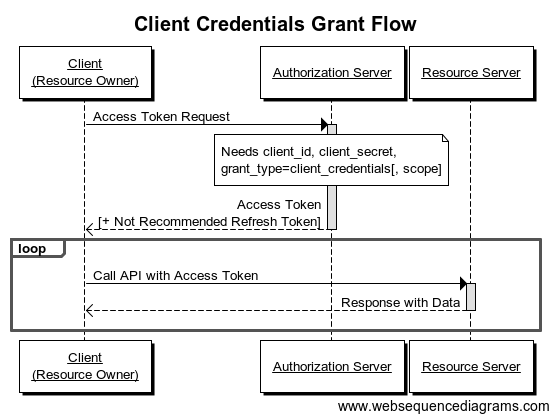
Client Credentials Grant
当客户端Client自己本身就是Resource Owner,那么意味着不用用户为之授权。
例子
- Resource Owner: 任意一个网站
- Resource Server: Google Cloud Storage
- Client: 同Resource Owner
- Authorization Server: 谷歌的认证服务器
场景
- 一个网站使用Google的存储服务,并存储了一系列的文件
- 网站先需要获取文件并且修改文件,则需要向谷歌的认证服务器发起认证请求
- 一旦授权成功,网站便可以获取到自己在Google存储上面自己的资源内容
在这里,网站的使用者就没有必要给网站授权自己的资源内容访问权限给网站。
时序图
配置Spring Boot + Security + Oauth2
本人使用的开发工具是Spring Tool Suite 4,构建项目的时候选择:Web、JPA、Thymeleaf、Security、Oauth2 Resource Server,如下

创建好项目之后,对应的pom.xml文件内容如下
<?xml version="1.0" encoding="UTF-8"?><project xmlns="http://maven.apache.org/POM/4.0.0" xmlns:xsi="http://www.w3.org/2001/XMLSchema-instance" xsi:schemaLocation="http://maven.apache.org/POM/4.0.0 http://maven.apache.org/xsd/maven-4.0.0.xsd"> <modelVersion>4.0.0</modelVersion> <parent> <groupId>org.springframework.boot</groupId> <artifactId>spring-boot-starter-parent</artifactId> <version>2.1.3.RELEASE</version> <relativePath/> <!-- lookup parent from repository --> </parent> <groupId>org.scut.storic</groupId> <artifactId>storic-rest</artifactId> <version>1.0.0</version> <name>storic-rest</name> <description>manager for storest based on fabric</description> <properties> <java.version>1.8</java.version> <skipTests>true</skipTests> </properties> <dependencies> <dependency> <groupId>org.springframework.boot</groupId> <artifactId>spring-boot-starter-data-jpa</artifactId> </dependency> <dependency> <groupId>org.springframework.boot</groupId> <artifactId>spring-boot-starter-thymeleaf</artifactId> </dependency> <dependency> <groupId>org.springframework.boot</groupId> <artifactId>spring-boot-starter-web</artifactId> </dependency> <dependency> <groupId>org.springframework.boot</groupId> <artifactId>spring-boot-starter-security</artifactId> </dependency> <dependency> <groupId>org.springframework.security.oauth</groupId> <artifactId>spring-security-oauth2</artifactId> <version>2.3.3.RELEASE</version> </dependency> <dependency> <groupId>org.springframework.boot</groupId> <artifactId>spring-boot-configuration-processor</artifactId> <optional>true</optional> </dependency> <dependency> <groupId>org.springframework.boot</groupId> <artifactId>spring-boot-starter-test</artifactId> <scope>test</scope> </dependency> <dependency> <groupId>org.springframework.security</groupId> <artifactId>spring-security-test</artifactId> <scope>test</scope> </dependency> <dependency> <groupId>mysql</groupId> <artifactId>mysql-connector-java</artifactId> </dependency> <dependency> <groupId>org.jasypt</groupId> <artifactId>jasypt</artifactId> <version>1.9.2</version> </dependency> <dependency> <groupId>com.google.code.gson</groupId> <artifactId>gson</artifactId> </dependency> <dependency> <groupId>com.google.guava</groupId> <artifactId>guava</artifactId> <version>24.0-jre</version> </dependency> <dependency> <groupId>org.apache.commons</groupId> <artifactId>commons-lang3</artifactId> </dependency> </dependencies> <build> <plugins> <plugin> <groupId>org.springframework.boot</groupId> <artifactId>spring-boot-maven-plugin</artifactId> </plugin> </plugins> </build></project>
配置Spring Security
首先配置Spring Security
CustomSecurityConfiguration.java
import org.springframework.context.annotation.Bean;import org.springframework.context.annotation.Configuration;import org.springframework.security.authentication.AuthenticationManager;import org.springframework.security.config.annotation.authentication.builders.AuthenticationManagerBuilder;import org.springframework.security.config.annotation.method.configuration.EnableGlobalMethodSecurity;import org.springframework.security.config.annotation.web.configuration.EnableWebSecurity;import org.springframework.security.config.annotation.web.configuration.WebSecurityConfigurerAdapter;import org.springframework.security.core.userdetails.UserDetailsService;import org.springframework.security.crypto.password.PasswordEncoder;@Configuration@EnableWebSecurity@EnableGlobalMethodSecurity(securedEnabled = true)public class CustomSecurityConfiguration extends WebSecurityConfigurerAdapter{ @Bean @Override protected UserDetailsService userDetailsService(){ //采用一个自定义的实现UserDetailsService接口的类 return new CustomUserDetailsService(); } @Override protected void configure(AuthenticationManagerBuilder auth) throws Exception { auth.authenticationProvider(new NullAuthenticationProvider()); super.configure(auth); } /** * Spring Boot 2 配置,这里要bean 注入 */ @Bean @Override public AuthenticationManager authenticationManagerBean() throws Exception { AuthenticationManager manager = super.authenticationManagerBean(); return manager; } @Bean public PasswordEncoder passwordEncoder() { //return PasswordEncoderFactories.createDelegatingPasswordEncoder(); return new CustomPasswordEncoder(); }}
CustomUserDetailsService.java
import java.util.ArrayList;import java.util.List;import org.scut.storic.persistent.entity.Account;import org.scut.storic.persistent.repository.AccountRepository;import org.slf4j.Logger;import org.slf4j.LoggerFactory;import org.springframework.beans.factory.annotation.Autowired;import org.springframework.security.core.GrantedAuthority;import org.springframework.security.core.authority.SimpleGrantedAuthority;import org.springframework.security.core.userdetails.UserDetails;import org.springframework.security.core.userdetails.UserDetailsService;import org.springframework.security.core.userdetails.UsernameNotFoundException;public class CustomUserDetailsService implements UserDetailsService { private static final Logger logger = LoggerFactory.getLogger(CustomUserDetailsService.class); @Autowired private AccountRepository accountRepository; @Override public UserDetails loadUserByUsername(String username) throws UsernameNotFoundException { logger.info("Load UserDetails by username: " + username); Account account = accountRepository.findByName(username); if (account == null) throw new UsernameNotFoundException(username); List<GrantedAuthority> authorities = new ArrayList<>(); for (String permission : account.getPermission().split(" ")) { if (permission.isEmpty()) continue; authorities.add(new SimpleGrantedAuthority(permission)); } return new CustomUser(username, account.getPassword(), true, true, true, account.isVerified(), authorities); }}
其中AccountRepository是为了从Mysql数据库中获取对应账户的权限内容,不再详细描述。
CustomUser.java
import java.util.Collection;import org.springframework.security.core.GrantedAuthority;import org.springframework.security.core.authority.SimpleGrantedAuthority;import org.springframework.security.core.userdetails.User;public class CustomUser extends User { /** * */ private static final long serialVersionUID = 1527936124593374191L; /** * Construct the <code>User</code> with the details required by * {@link org.springframework.security.authentication.dao.DaoAuthenticationProvider}. * * @param username the username presented to the * <code>DaoAuthenticationProvider</code> * @param password the password that should be presented to the * <code>DaoAuthenticationProvider</code> * @param enabled set to <code>true</code> if the user is enabled * @param accountNonExpired set to <code>true</code> if the account has not expired * @param credentialsNonExpired set to <code>true</code> if the credentials have not * expired * @param accountNonLocked set to <code>true</code> if the account is not locked * @param authorities the authorities that should be granted to the caller if they * presented the correct username and password and the user is enabled. Not null. * * @throws IllegalArgumentException if a <code>null</code> value was passed either as * a parameter or as an element in the <code>GrantedAuthority</code> collection */ public CustomUser(String username, String password, boolean enabled, boolean accountNonExpired, boolean credentialsNonExpired, boolean accountNonLocked, Collection<? extends GrantedAuthority> authorities) { super(username, password, enabled, accountNonExpired, credentialsNonExpired, accountNonLocked, authorities); } @Override public boolean isCredentialsNonExpired() { return super.isCredentialsNonExpired(); } @Override public boolean isAccountNonExpired() { return super.isAccountNonExpired(); } @Override public boolean isAccountNonLocked() { return super.isAccountNonLocked(); } public boolean isManager() { return this.getAuthorities() .contains(new SimpleGrantedAuthority("ROLE_ADMIN")); } public boolean isSystemManager() { return this.getAuthorities() .contains(new SimpleGrantedAuthority("ROLE_SYSTEM_ADMIN")); }}
CustomPasswordEncoder.java
import org.springframework.security.crypto.password.PasswordEncoder;public class CustomPasswordEncoder implements PasswordEncoder { @Override public String encode(CharSequence rawPassword) { return PasswordHelper.encryptPassword(rawPassword.toString()); } @Override public boolean matches(CharSequence rawPassword, String encodedPassword) { return PasswordHelper.checkPassword(rawPassword.toString(), encodedPassword.toString()); }}
PasswordHelper.java
import java.util.HashMap;import java.util.Map;import org.jasypt.digest.StandardStringDigester;import org.jasypt.util.password.PasswordEncryptor;public class PasswordHelper { public enum Type{ SHA256_BASE64("SHA-256", "base64"), SHA256_HEX("SHA-256", "hexadecimal"), MD5_BASE64("MD5", "base64"), MD5_HEX("MD5", "hexadecimal"); private String algorithm; private String outputType; private Type(String algorithm, String value) { this.algorithm = algorithm; this.outputType = value; } public String getAlgorithm() { return algorithm; } public String getOutputType() { return outputType; } } private final static class MyPasswordEncryptor implements PasswordEncryptor { private final StandardStringDigester digester; public MyPasswordEncryptor(String algorithm) { this.digester = new StandardStringDigester(); this.digester.setAlgorithm(algorithm); this.digester.setIterations(1000); this.digester.setSaltSizeBytes(8); } public void setStringOutputType(final String stringOutputType) { this.digester.setStringOutputType(stringOutputType); } public String encryptPassword(final String password) { return this.digester.digest(password); } public boolean checkPassword(final String plainPassword, final String encryptedPassword) { return this.digester.matches(plainPassword, encryptedPassword); } } private static Map<Type, MyPasswordEncryptor> passwordEncryptors = new HashMap<Type, MyPasswordEncryptor>(); private PasswordHelper(){} private static PasswordEncryptor getPasswordEncryptor(final Type type) { if (passwordEncryptors.get(type) == null) { synchronized (passwordEncryptors) { if (passwordEncryptors.get(type) == null) { MyPasswordEncryptor passwordEncryptor = new MyPasswordEncryptor(type.getAlgorithm()); passwordEncryptor.setStringOutputType(type.getOutputType()); passwordEncryptors.put(type, passwordEncryptor); } } } return passwordEncryptors.get(type); } public static String encryptPassword(final String password) { return getPasswordEncryptor(Type.SHA256_BASE64).encryptPassword(password); } public static String encryptPassword(final String password, final Type type) { return getPasswordEncryptor(type).encryptPassword(password); } public static boolean checkPassword(final String plainPassword, final String encryptedPassword) { return getPasswordEncryptor(Type.SHA256_BASE64).checkPassword(plainPassword, encryptedPassword); } public static boolean checkPassword(final String plainPassword, final String encryptedPassword, final Type type) { return getPasswordEncryptor(type).checkPassword(plainPassword, encryptedPassword); }}
NullAuthenticationProvider.java
import org.springframework.security.authentication.AuthenticationProvider;import org.springframework.security.core.Authentication;import org.springframework.security.core.AuthenticationException;public class NullAuthenticationProvider implements AuthenticationProvider { @Override public Authentication authenticate(Authentication authentication) throws AuthenticationException { return authentication; } @Override public boolean supports(Class<?> authentication) { return (NullAuthenticationToken.class.isAssignableFrom(authentication)); }}
NullAuthenticationToken.java
import org.springframework.security.authentication.AbstractAuthenticationToken;import org.springframework.security.core.userdetails.User;public class NullAuthenticationToken extends AbstractAuthenticationToken { /** * */ private static final long serialVersionUID = 4544894451246623482L; private final Object principal; public NullAuthenticationToken(User principal) { super(principal.getAuthorities()); this.principal = principal; setAuthenticated(true); } @Override public Object getCredentials() { return null; } @Override public Object getPrincipal() { return principal; }}
配置Oauth2
Oauth2需要配置一下三项:AuthorizationServer、ClientDetailsService、ResourceServer
CustomAuthServerConfiguration.java
import java.util.concurrent.TimeUnit;import org.scut.storic.utils.PasswordHelper;import org.springframework.beans.factory.annotation.Autowired;import org.springframework.context.annotation.Configuration;import org.springframework.http.HttpMethod;import org.springframework.security.authentication.AuthenticationManager;import org.springframework.security.core.userdetails.UserDetailsService;import org.springframework.security.oauth2.config.annotation.configurers.ClientDetailsServiceConfigurer;import org.springframework.security.oauth2.config.annotation.web.configuration.AuthorizationServerConfigurerAdapter;import org.springframework.security.oauth2.config.annotation.web.configuration.EnableAuthorizationServer;import org.springframework.security.oauth2.config.annotation.web.configurers.AuthorizationServerEndpointsConfigurer;import org.springframework.security.oauth2.config.annotation.web.configurers.AuthorizationServerSecurityConfigurer;import org.springframework.security.oauth2.provider.token.store.InMemoryTokenStore;@Configuration@EnableAuthorizationServerpublic class CustomAuthServerConfiguration extends AuthorizationServerConfigurerAdapter { @Autowired AuthenticationManager authenticationManager; @Autowired UserDetailsService userDetailsService; private static final String DEMO_RESOURCE_ID = "storicid"; @Override public void configure(ClientDetailsServiceConfigurer clients) throws Exception { //Oauth2 默认使用BCryptPasswordEncoder作为加密方法,需要在加密之后的字符前加{bcrypt} //String finalSecret = "{bcrypt}" + new BCryptPasswordEncoder().encode("storic-secret"); String finalSecret = PasswordHelper.encryptPassword("storic-secret"); //这里通过实现 ClientDetailsService接口 clients.withClientDetails(new BaseClientDetailService()); //配置客户端,一个用于password认证一个用于client认证 clients .inMemory() .withClient("client_app") .resourceIds(DEMO_RESOURCE_ID) .authorizedGrantTypes("client_credentials", "refresh_token", "password") .scopes("select") .authorities("oauth2") .secret(finalSecret) .accessTokenValiditySeconds((int)TimeUnit.DAYS.toSeconds(1)) .refreshTokenValiditySeconds((int)TimeUnit.DAYS.toSeconds(1)) .and() .withClient("client_web") .resourceIds(DEMO_RESOURCE_ID) .authorizedGrantTypes("authorization_code", "client_credentials", "refresh_token", "password", "implicit") .scopes("read", "write", "trust") .authorities("oauth2") .secret(finalSecret) .accessTokenValiditySeconds((int)TimeUnit.DAYS.toSeconds(1)) .refreshTokenValiditySeconds((int)TimeUnit.DAYS.toSeconds(1)); } @Override public void configure(AuthorizationServerEndpointsConfigurer endpoints) throws Exception { endpoints .tokenStore(new InMemoryTokenStore()) .authenticationManager(authenticationManager) .userDetailsService(userDetailsService) // 不添加无法正常使用refresh_token .allowedTokenEndpointRequestMethods(HttpMethod.GET, HttpMethod.POST, HttpMethod.PUT, HttpMethod.DELETE); } @Override public void configure(AuthorizationServerSecurityConfigurer oauthServer) throws Exception { //允许表单认证 //这里增加拦截器到安全认证链中,实现自定义认证,包括图片验证,短信验证,微信小程序,第三方系统,CAS单点登录 //addTokenEndpointAuthenticationFilter(IntegrationAuthenticationFilter()) //IntegrationAuthenticationFilter 采用 @Component 注入 oauthServer .realm(DEMO_RESOURCE_ID) .tokenKeyAccess("permitAll()") .checkTokenAccess("isAuthenticated()") .allowFormAuthenticationForClients(); }}
这里ClientDetailService基于内存的方式,是最简单的一种方式,在真是环境中,一般建议结合JDBC或者Redis。为此可以自定义这个ClientDetailService
CustomClientDetailService.java (可选)
import java.util.Arrays;import java.util.HashSet;import java.util.Set;import java.util.concurrent.TimeUnit;import org.slf4j.Logger;import org.slf4j.LoggerFactory;import org.springframework.security.core.authority.AuthorityUtils;import org.springframework.security.oauth2.provider.ClientDetails;import org.springframework.security.oauth2.provider.ClientDetailsService;import org.springframework.security.oauth2.provider.ClientRegistrationException;import org.springframework.security.oauth2.provider.NoSuchClientException;import org.springframework.security.oauth2.provider.client.BaseClientDetails;/** * 自定义ClientDetailsService,可以灵活定义auth2拦截的接口、权限集合等 * @author chenzhiling * */public class CustomClientDetailService implements ClientDetailsService { private static final Logger log = LoggerFactory.getLogger(CustomClientDetailService.class); @Override public ClientDetails loadClientByClientId(String clientId) throws ClientRegistrationException { BaseClientDetails client = null; //这里可以改为查询数据库 if("client_app".equals(clientId)) { log.info("Create a app client detail."); client = new BaseClientDetails(); client.setClientId(clientId); client.setClientSecret("{noop}123456"); client.setResourceIds(Arrays.asList("order")); client.setAuthorizedGrantTypes(Arrays.asList("authorization_code", "client_credentials", "refresh_token", "password", "implicit")); //不同的client可以通过一个scope 对应权限集 client.setScope(Arrays.asList("all", "select")); client.setAuthorities(AuthorityUtils.createAuthorityList("ADMIN_ROLE")); client.setAccessTokenValiditySeconds((int)TimeUnit.DAYS.toSeconds(1)); //1天 client.setRefreshTokenValiditySeconds((int)TimeUnit.DAYS.toSeconds(1)); //1天 Set<String> uris = new HashSet<>(); uris.add("/login"); client.setRegisteredRedirectUri(uris); } if(client == null) { throw new NoSuchClientException("No client width requested id: " + clientId); } return client; }}
CustomResServerConfiguration.java
import org.springframework.context.annotation.Configuration;import org.springframework.http.HttpMethod;import org.springframework.security.config.annotation.web.builders.HttpSecurity;import org.springframework.security.config.http.SessionCreationPolicy;import org.springframework.security.oauth2.config.annotation.web.configuration.EnableResourceServer;import org.springframework.security.oauth2.config.annotation.web.configuration.ResourceServerConfigurerAdapter;import org.springframework.security.oauth2.config.annotation.web.configurers.ResourceServerSecurityConfigurer;/** * Spring Security 中的ResourceServerConfigurerAdapter配置会覆盖WebSecurityConfigurerAdapter * protected void configure(HttpSecurity http) 中的配置会以ResourceServerConfigurerAdapter为准 * @author chenzhiling * */@Configuration@EnableResourceServerpublic class CustomResServerConfiguration extends ResourceServerConfigurerAdapter { private static final String RESOURCE_ID = "storicid"; @Override public void configure(ResourceServerSecurityConfigurer resources) { resources.resourceId(RESOURCE_ID).stateless(true); } @Override public void configure(HttpSecurity http) throws Exception { // Since we want the protected resources to be accessible in the UI as well we need // session creation to be allowed (it's disabled by default in 2.0.6) http .httpBasic() .and() .sessionManagement() .sessionCreationPolicy(SessionCreationPolicy.IF_REQUIRED) .and() .authorizeRequests() .antMatchers("/") .permitAll() .and() .logout() .permitAll() .and() .authorizeRequests() .antMatchers("/oauth/*") .permitAll() .and() .authorizeRequests() .antMatchers("/v2/api-docs", "/configuration/**", "/swagger*/**", "/webjars/**", "/**/*.js", "/**/*.css", "/**/*.png") .permitAll() .and() .authorizeRequests() .regexMatchers(HttpMethod.POST, "/user") .permitAll() .and() .authorizeRequests() .antMatchers("/admin/**") .access("#oauth2.hasScope('read')") .antMatchers("/admin/**") .hasAnyAuthority("ROLE_ADMIN") .and() .authorizeRequests() .anyRequest() .authenticated() .and() //关闭默认的csrf认证 .csrf() .disable(); }}
对于http的Security拦截可以灵活根据不同的需求定义,这里只是极尽可能列出不同情况。
Reference
]]>